The best way of propagating Monstera adansonii is by stem cutting in water or soil (including soilless potting mixes). But you can also propagate this Monstera by air layering or using seeds. If it surprises you, there are Monstera seeds on sale but are rare to find.
If you are a newbie, worry not. Monstera adansonii propagation is straightforward. But it needs a little patience. And within a few weeks to months, you will have several baby plants you can give your relatives and friends or sell online on eBay, Etsy.com, Amazon, and so on.
Contents
- Are you new to Monstera adansonii?
- How to propagate Monstera adansonii
- 1. Propagating Monstera adansonii by stem cutting
- Success tips
- What you need
- i. Monstera adansonii propagation water
- ii. Propagating monstera adansonii in soil or soilless potting mix
- 2. Propagating Monstera Adansonii by air layering
- 3. Propagating Monstera Adansonii by seeds
- Warning
- What you need
- Steps to follow
- What to expect
- When to transplant
- Transplanting shock
- Monstera adansonii care and growing needs
Are you new to Monstera adansonii?
Monstera adansonii is an adorable, easy to grow, exotic houseplant with eye-catching foliage. It has mainly entire juvenile leaves and fenestrated (perforated) adult leaves. But unlike other Monsteras, its juvenile leaves get holes while it is very young.
If you loved the more popular Monstera deliciosa, adansonii is a smaller version. But it doesn’t have split leaves. Also, you need to know that there are Monstera adansonii narrow, wide, and normal forms. Don’t get confused.
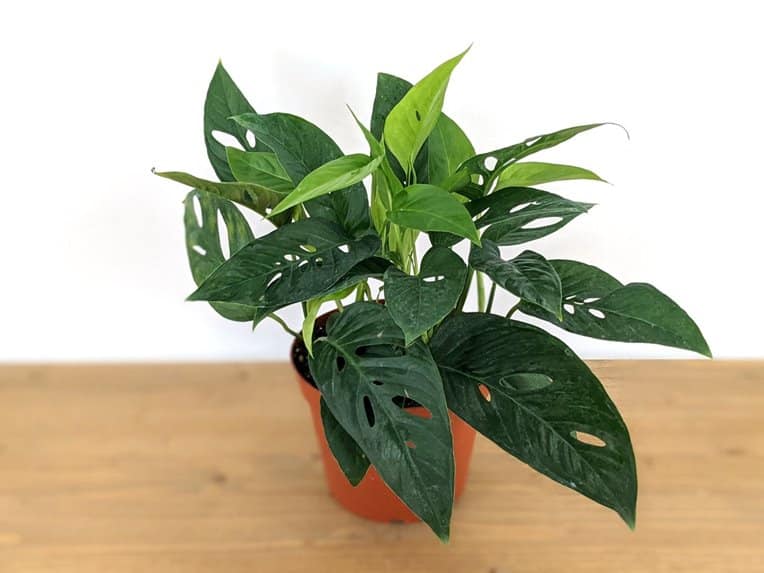
Besides the forms, there are also subspecies, i.e., Monstera adansonii var. laniata (Monstera friedrichsthalii), Monstera adansonii var. adansonii, Monstera adansonii var. klotzschiana, and Monstera adansonii subsp. blanchetii. We hope we haven’t lost you completely. We prefer that you know them well. See Monstera adansonii varieties and forms for details.
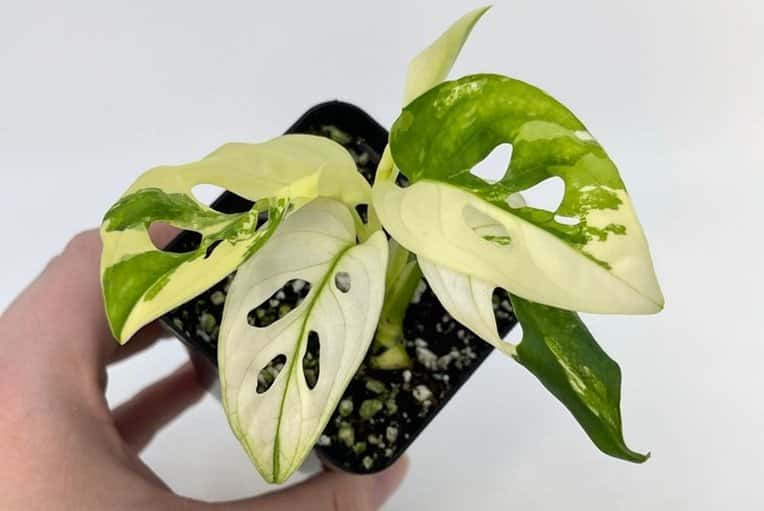
If you want something a little more colorful, buy the variegated Monstera adansonii pictured below. It is a charming but rare and expensive option.
Last but not least, the other common name for Monstera adansonii are the Swiss Cheese plant or vine, Adanson’s Monstera, the five holes plant, Monstera Monkey Mask, Cheese Swiss philodendron. But note that it is not a philodendron.
How to propagate Monstera adansonii
As hinted, you can propagate Monstera adansonii by stem cutting, air layering, or seeds. All these methods will yield success, and they have their pros and cons. We have never had success with leaf propagation.
If you have made your mind to propagate your Monstera, we recommend you wait until early spring. It is the best time as the plant is about to begin thriving, and it will give your plant ample time to root and have enough growth just before cold seasons.
Let us look at each of these methods in detail:
1. Propagating Monstera adansonii by stem cutting
The best way to propagate Monstera adansonii is by stem cutting, and you can do it in water or soil. There isn’t much difference between these two methods. Here is about how to go with each method.
Success tips
- Keep your cutting in a warm area with bright, indirect light. Temperatures of 65 to 80 degrees Fahrenheit (18 to 27 °C) are ok.
- Keep your Monstera adansonii cutting at high humidity, ideally above 60%. Higher humidity will ensure more success.
- Don’t fertilize your cutting unless it is to boost rooting. Its roots haven’t developed enough for it to effectively use fertilizers. Also, they may burn your cutting.
- Take several cuttings since some may die during the process. But remember the upper side since you need to place them upright in water or soil and not downfacing.
- If you want bushier growth, plant several cuttings in one pot.
- Trim any long internodes, leaving only about ¼ to ½ an inch to the node. It will not grow roots and makes nutrients and water travel a longer distance.
What you need
We are going to give you what you need for both water and soil propagation. The difference will be using water instead of soil or potting mix. Also, you will use a water jar in place of a pot.
- Water or well-draining, growth media like sphagnum moss, potting mix, or soil
- Transparent Ziplock plastic (suitable for soil propagation as it will lock moisture)
- A sharp, sterilized pruning knife or sheers. You can use rubbing alcohol to disinfect it. A blunt one will damage the cutting and increase the chances of rot.
- Otherwise, if contaminated, it may cause rot and other diseases to your cutting.
- Rooting hormone. It will promote faster rooting and reduce the chances of rots. We have the best experience with HydroDynamics Clonex Rooting Gel. Safe Garden Brand is also good.
- A growing pot (nursery growing pots) with drainage holes or a water jar.
- Wear clean gloves if you have sensitive skin. The Monstera sap may cause some irritation.
i. Monstera adansonii propagation water
- Select and cut a mature, healthy stem with at least a node just below the node. The node is where the petiole meets the stem. It is where a new bud and roots will grow. A node may appear as a brownish knobby ring with some roots near it. Avoid any that look weak, diseased, mushy, limp, or have yellow leaves. They are likely to die.
- If it has more than two leaves, remove the lower leaves. Your cutting cannot support a lot of leaves at this stage.
- Apply your rooting hormone on the cut end and dip it into your jar with water. You can use tap water. However, if it has a high chlorine concentration, let it stand in an open container overnight or use rainwater. The node must be in the water. But don’t submerge the leaves.
- Take your plant in a place with a warm place with bright, indirect light.
- Fill the water if the level goes low and change it every 3 to 4 days or when it appears cloudy. Otherwise, it may grow algae that will facilitate root rot. Add some rooting hormone each time you change your water.
What to expect
The plant will start growing roots after 3 to 4 weeks. Also, you will see new growth, i.e., a bud them unfurling leaves. It may take up to two months for the plant to be ready for transplant. How fast it grows depends on the conditions you provide.
Pros
- You can monitor rooting progress and see any signs of root rot early.
- There is less chance of pests attacking your plants, especially the non-flying ones.
- It can work as a centerpiece in your living spaces
- It is less messy. You don’t have to worry about handling soil or it spilling anywhere in your home.
Cons
- It takes longer.
- The plant will receive lesser nutrients, i.e., water doesn’t have a lot of nutrients.
- Plants suffer from a severe transplant shock
ii. Propagating monstera adansonii in soil or soilless potting mix
- Begin by preparing your potting mix or soil. For soil, peat moss, and perlite or potting mixture, put it in your growing pot and water it until excess comes from the drainage hole. Discard whatever collects on your saucer. But if you are using sphagnum moss alone, soak in water and then wring it afterward.
- Again, select and cut a healthy plant with at least a node. Use a sterilized pruning knife or scissors. Remove any lower leaves.
- Dip the cut end in your rooting hormone, then poke a hole in your growth media and plant it. Ensure the soil covers at least a node. Next, tamp the potting mix lightly to make sure the cutting remains upright.
- Cover your plant with your Ziploc bag and seal it, leaving a small opening. However, the leaves don’t touch the bag.
- Move your plant to a warm place with bright, indirect light.
- Routinely, check if the soil is moist and mist it if it begins to dry. Never let the soil dry. Also, remove the Ziploc bag for an hour or so a few times a week to help your plant breathe.
What to expect
Your plant should begin rooting after 2 to 3 weeks. There will also be new growth, and after 1 to 2 months, it may be ready for transplant. Again, how soon this happens depends on the growing conditions you provide.
Pros
- The plant will adapt faster when you finally transplant it. So, your plant will have less shock. Also, some people may grow their cutting directly into their growing pot. This will make transplants unnecessary for a few years.
- Your plant will get a lot of nutrients from the soil or potting mix. You expect a healthier plant.
- From our experience, rooting occurs much faster
- There is no hassle of changing water. You need to ensure the soil doesn’t dry.
- Reduced instances of root rot and algae problem
Cons
- You cannot see the roots grow. This makes it hard to monitor the process or know if the plant is rotting.
- The soil makes everything a little messy.
2. Propagating Monstera Adansonii by air layering
Air layering is one of the most reliable ways to propagate Monstera adansonii. But you will have content with some sphagnum moss wrapped on some nodes. I hope you don’t mind them. But if you are creative, you can hide the wrappings with leaves. Just rearrange them to ensure they are not visible.
Here, choose the nodes you want to use in air layering. They should be on a healthy stem. You will eventually cut the plant just below these nodes as you transplant it.
To succeed, apply some rooting hormone and make a slight nip near the node with a sterilized pruning knife. But these steps are optional.
Take a moist sphagnum moss ball, wrap it around the nodes with a plastic bag. Next, make some holes in the plastic bag to allow aeration using a toothpick. This is to promote air circulation, and roots need oxygen to grow.
Keep the sphagnum ball moist, i.e., mist it after a few days or when it feels a little dry. However, please don’t overdo it. Too much water may cause some rotting.
Last but not least, once the roots are about 3 to 4 inches long, you can cut just below the node and transplant your Monstera.
3. Propagating Monstera Adansonii by seeds
Monstera adansonii has oblong black to graying seeds that may have a brown or greenish tinge. They are about the size of a pea or slightly smaller but more elongated.
You can buy these seeds at Etsy.com, eBay, or a few other trusted vendors. Please be careful. Some people will scam you, especially those claiming to sell variegated Monstera adansonii.
Last but not least, it is not hard to propagate this Monstera from seeds. But it is a little harder to get the seeds. And you need to ensure you provide it with optimum conditions.
Warning
If you opt for growing Monstera from seed, ensure the seeds remain in a moist area, including your fridge, i.e., they shouldn’t get dehydrated. Why? Because they will lose their viability.
That is not all. These seeds don’t store well, i.e., they have a short shelf life. So, plant them immediately. If you live them for a low time, they will not germinate.
What you need
- Well-drained soil or sphagnum moss
- Growing container or tray
- Transparent plastic bag, cling film, or Ziploc bag if you don’t have a greenhouse cabinet.
Steps to follow
- Put your growth medium in your germinating tray or growing container and water it thoroughly until excess water comes from drainage holes. Pour any that collects on the tray. For sphagnum moss, soak it in water and wring excess water.
- Place your Swiss cheese plant seeds on your growth media and shallowly cover them with some soil or potting mix.
- Cover them with a transparent plastic bag. It will help trap moisture.
- Next, please place them in a warm place with bright indirect light. Ideal germination temperatures are 70 to 75 degrees Fahrenheit (21 to 24 °C). But room temperature will work well.
- Routinely check the soil to ensure it remains moist but not soggy. Mist it if it begins to dry. Also, remove the plastic bag for a few hours, 2 or 3 times a week, to allow some breathing.
- Once they germinate, remove the plastic bag. However, ensure the soil remains moist but not soggy.
Your seeds will start germinating after 2 to 3 weeks. When the seedling is about 1 to 3 inches long, the seed coats will be empty and shriveled.
Once they grow a few leaves (after a month or so), you can transplant them to their growing pot and continue caring for them as you do to any of your Monstera adansonii plants.
Lastly, if necessary, you can soak the seeds in water for 12 to 24 hours. However, since they are not completely dry, we don’t see the point.
What to expect
Depending on the freshness of the seeds and conditions, expect a germination rate of 50 to 100%. If you let them in a soggy medium, expect more to rot.
When to transplant
We recommend that you wait until the roots are at least 2 to 3 inches long and there is some new growth. But letting secondary roots grow will ensure much success.
Select a pot with drainage holes and chunky, well-drained, organic-rich soil or potting mix.
Immediately after transplanting, you need to water the plant more, keeping the soil moist but not soggy. It needs time to adjust, mainly if propagated in water. Afterward, gradually reduce the watering and care for it as a normal plant.
Transplanting shock
When transplanting your baby plant, it may suffer from a bit of shock. This is common in cuttings propagated in water. Signs to expect are:
- Your Monstera leaves drooping or wilting
- Leaves curling
- Leaves turning yellowish then brownish
- Defoliation
With proper care, your plant should recover after a few days to weeks. However, in some cases, your plant may die.
Monstera adansonii care and growing needs
We know you have successfully propagated your plant. We thought it best also to give you a summary of Monstera adansonii care and growing needs. Why? Because after transplanting, you will need to care for it well.
We will not go into details as we have already covered it elsewhere. Here is a quick summary that will help you.
| Care level | Easy or low maintenance. It will grow well in average household conditions |
| USDA hardiness zone | 10b to 12. It cannot withstand frost, and freezing temperatures will start killing your plant. |
| Temperature | The ideal temperature should be about 60 to 80°F (15 to 27 °C) |
| Humidity | This Monstera prefers above-average humidity, i.e., 60% or above. However, it will still thrive in at least 40 to 50%. If your humidity is too low, mist it a few times, buy a humidifier or consider a pebble tray. |
| Light | It needs bright, indirect light, including artificial grow lights. But please ensure no direct sunlight (burn leaves) or low lights (will cause slow-growing leggy plants with tiny yellow leaves). |
| Soil | The best soil of Monstera adansonii should be well-drained, aerated, and rich in organic matter. Avoid sandy (will not hold moisture), heavy or muddy ones. |
| Water | It requires medium watering. Water when top 2-3 inches of the soil dries. |
| Fertilizer | They require medium feeding. Apply a balanced, all-purpose, liquid indoor plant food once a month during growing months only. Also, you can use a slow-release formula for potted plants. |
| Pruning and grooming | Regularly prune dying, damaged, or diseased leaves with sterilized pruning shears and wipe dusty leaves. During the growing season, you can also cut off a few branches or stems from controlling growth. |
| Potting and repotting | Remember to repot your Monstera after every 2 to 3 years or when it is rootbound. Pick a pot 2-3 times wider in diameter. |
| Toxicity | It is toxic or harmful to humans, dogs, cats, and other pets |



Leave a Reply