While looking at how to prune Monstera, we will begin by answering the fundamental question of whether you can prune these plants or not. The answer is of course yes.
Afterward, we will tell you the importance of signification and then will take you through the steps and what you need. It is an easy process and you will be able to prune your plant like a pro!
Contents
- Can you prune Monstera, and why?
- 1. To get rid of damaged, dead, or dying plant parts
- 2. Manage and control some diseases
- 3. Allow light penetration and air circulation
- 4. Control shape and size
- 4. Encourage a fuller or bushy growth
- 6. You want to propagate a new plant
- When to prune Monstera?
- How to prune Monstera – What you need and steps to follow
- What you need
- Steps to follow
- Step 01: Remove dead, dying, damaged or diseased parts
- Step 02: Mark or decide branches you want to cut
- Step 03: Make clean cuts
- Step 04: Discard what you cut
- Should I prune aerial roots?
- Aftercare
Can you prune Monstera, and why?
Yes, you can prune Monstera, be it Monstera deliciosa, Monstera adansonii, or the species you have, and you should. And this is the process of is removing some plant parts – leaves, buds, stems, spent flowers, aerial roots, etc.
The next obvious question will be why. Here are why you should or may have to prune your Monstera.
1. To get rid of damaged, dead, or dying plant parts
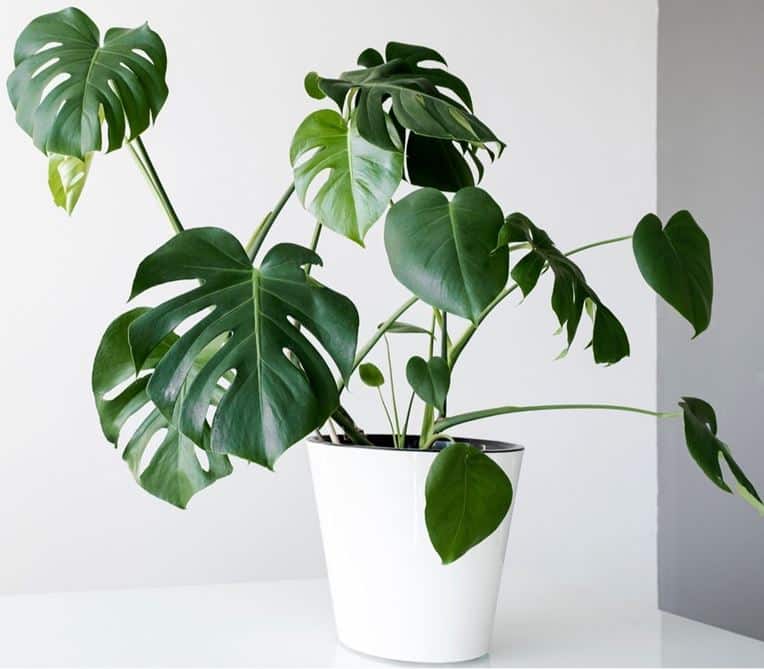
The first reason to prune your Swiss cheese plant or other Monstera species is to remove those injured, dead, or dying parts. These include the yellow, brown, or black leaves, stems, and branches.
Why? Because the dead, damaged, or dying leaves or any other part of this houseplant doesn’t contribute to the plant, i.e., will not photosynthesis. Yet, they will still eat on the plant, i.e., use their energy. Removing such parts will give your plant a chance to focus its energy on new growth, and your plant will be healthier.
To make matters worse, dead or dying leaves and other parts may attract pests and encourage disease because they don’t have the same defense as healthy ones. You may see them growing molds, and they will provide a perfect hiding place for pests, which can spread to healthier plants.
Lastly, they look unsightly. We bet no one wants to see those black, brown, or yellow leaves on your Monstera. This alone is a reason anyone will want to chop them off immediately.
2. Manage and control some diseases
If your plant has diseased leaves or any other part, you need to cut it off to prevent spread immediately. But first, isolate the infected plant.
Pruning may not work for all diseases, primarily if they have spread. For instance, if your plant has bacterial leaf spot disease and is all over your plant, we recommend you discard the whole plant because they are untreatable.
On the other hand, you can cut the affected part and apply fungicides to prevent reinfection or spread for cases of fungal diseases.
3. Allow light penetration and air circulation
We also desire a very bushy Monstera. It looks amazing. But some cases of a very tangled and bushy plant may prevent light from penetrating to inner leaves or reaching areas not facing the window. So, parts that don’t light will become leggy.
Also, it may affect air circulation, provide a perfect hiding place for pests, and so on.
If you remove a few leaves and stems, it may be possible for light to penetrate and reach most of the plant. Also, pests won’t find a hiding place. This way, you will have a healthier, more balanced plant.
4. Control shape and size
Another crucial reason to prune Monstera is to control size and shape. These adorable plants can get very big. They can grow as long as 70 feet or more in the wild.
When indoors, they tend to be smaller. But some will still get very large. For instance, a Monstera deliciosa can grow as big as 8-15 feet high and over 8 feet wide. In such a case, you may have to cut a few branches to keep it smaller and in shape you need it.
Besides pruning, you can also train your plant to help control its shape. However, if it’s too large, you need to cut it back.
4. Encourage a fuller or bushy growth
If you have a leggy plant, pruning may help encourage more and fuller growth. Monsteras grow new branches just beneath the point you cut.
So, if you want it to spread, cut lateral branches and if you want it taller, target the dominant stem. Dominant stems are those growing upward.
6. You want to propagate a new plant
The final reason why you may prune this houseplant is to get a stem cutting for propagation. It should have at least a node. Remember, you cannot propagate Monstera without a node, i.e., using leaves or aerial roots.
Select a healthy, mature stem with at least two nodes to increase survival chances and cut below the lowest node.
When to prune Monstera?
When to prune your Monstera depends on what you are pruning. For minor pruning cases such as cutting dead, dying, damaged or diseased leaves, stems, or aerial roots, you can do it at any time of the year.
On the other hand, if you intend to do a major pruning that will include cutting back the plant to control its shape, size, allow light penetration, we recommend doing it in late winter or early spring just before the plant starts to grow actively.
Don’t do a major pruning during fall or winter because, at this time, your plant is growing minimally. So, it will take longer to recover or put on new growth.
How to prune Monstera – What you need and steps to follow
Pruning your Monstera or any other houseplant is an easy activity if you know how to do it correctly. Let us look at what you need and steps to follow:
What you need
1. Sharp gardening shears or scissors:
What to use depends on the size of stem you will be cutting. A gardening shear will work best for larger, mature stems, while a kitchen scissor is suitable for trimming damaged parts of the leaves such as brown margins or tips.
We use Felco Pruning Shears (F 6) - High-Performance Swiss Made One-Hand Garden Pruners for all our pruning purposes. It is suited for small hands, has a sturdy design and is lightweight. Also, it consistently performs well, and the ergonomic grip is another thing you will love.
2. Thick gardening gloves
Since this plant has sharp, needle-like insoluble calcium oxalates that may cause skin irritation, we recommend you wear gardening gloves. We use COOLJOB Gardening Gloves. They have both for men and women. These breathable, rubber coated gloves are durable, comfortable, and snugly fit.
3. 70 to 100% rubbing alcohol
Also known as isopropyl alcohol, use it to disinfect your shears to avoid spreading disease. Amazon Brand - Solimo 99% Isopropyl Alcohol for Technical Use will do the job.
Steps to follow
It’s time to go to the actual pruning exercise. It’s easy. But it would help if you did it judiciously. Here are some steps to follow:
Step 01: Remove dead, dying, damaged or diseased parts
Use your disinfected gardening scissor or shear to cut off any dead, damaged, dying, or diseased leaves as close to where they are attached to the stem as possible.
If diseased, disinfect each time you cut with your rubbing alcohol. You will also cut any diseased stems or aerial roots at this stage.
Last but not least, if only margins or tips are brown such as in the case of leaf scorch, only trim these margins, don’t remove the whole leaf.
Step 02: Mark or decide branches you want to cut
Once the dead, diseased, or damaged parts are gone, you must carefully study your plant structure and shape. Next, decide or mark where you want to cut. Pick points that will make your plant balanced and achieve the desired look.
The exact branch or stem to pick will depend on what you are trying to achieve. You will trim the dominant stems if you want a shorter, fuller plant. Remember, new branches will grow on the node below the cut point.
On the other hand, if you want a more expansive, stout plant, you will cut some of the lateral leggy stems. Cut them close to the center of the plant.
Lastly, as you mark or decide cutting points, you will find stager so that new growth is all over the plant. Don’t cut all at the same level or height.
Step 03: Make clean cuts
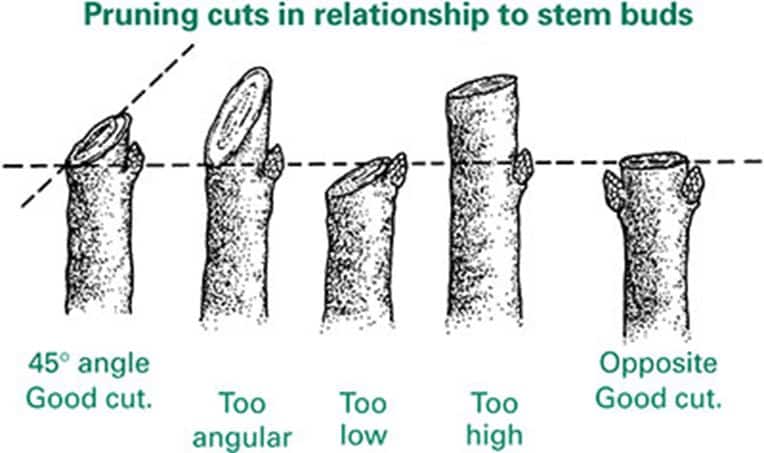
Use your gardening shear or scissor to make a clean cut on stems, just above the node of the point you selected. The node is the knobby or ring-like area where leaves grow. Don’t injure it, as it’s where a new shoot will grow.
You can cut it flat or follow what Rutgers, the State University of New Jersey, recommends, i.e., “prune ¼ inch above the bud, sloping down and away from it at a 45-degree angle. Avoid cutting too close or steep, or the bud may die.”
Lastly, never cut more than 25% of the branches at any given time. It may weaken your plant.
Step 04: Discard what you cut
If you don’t intend to propagate your plant, discard the leaves, stems, and branches you cut. You can compost them if not diseased.
Should I prune aerial roots?
Whether to prune Monstera aerial root or not is more of a personal choice. You can decide to leave them alone, tie them to the climbing pole, or redirect them to the soil.
Some people put them in water. We don’t recommend it since they will risk overwatering these plants as they have another secondary water source.
Aftercare
There is no special aftercare required besides the regular Monstera care routine. Also, don’t paint the cut areas or use wound dressing.
Some of the things to ensure faster regeneration include the following:
- Provide bright, indirect light: Provide your plants with bright, indirect light for at least 12 hours a day. See Monstera light needs.
- Maintain correct humidity: Keep the humidity at 50% or more. These plants grow faster under high humidity. Just ensure there is proper air circulation.
- Feed or fertilizer your plants: Since they need nutrients to grow, feed your plant once a month during the growing seasons. Use an all-purpose, balanced houseplant fertilizer.
- Water your Monstera well: Water your Monstera when the top few inches of the soil feel dry. Please don’t overdo it, as your plant may end up with root rot. See Monstera watering.
- Maintain optimum temperature: Keep the temperature between 65- and 85-degrees Fahrenheit. Lower temperatures will slow growth.


Leave a Reply